The photographs obtained using a zone plate in place of an objective, like pinhole photos, undergo significant digital noise and have a distinct character in comparison to that present on normal photographs obtained with an objective.
A zone plate is definitely more luminous than a pinhole, but remains anyway much less luminous than a traditional objective; therefore you often use the high sensitivity of the camera and/or lengthy exposure times. The images obtained are also very soft not only in terms of detail, but also contrast. Often therefore you apply levels and contrast curves in Photoshop in order to give energy to the photograph, while simultaneously amplifying the digital noise present in the image.
The characteristics of the noise are extremely different from those seen in a traditional digital photograph. I have noticed, using both zone plates and pinholes, a strong diagonal banding at high frequency that crosses the entire image. In the shadows the noise then is intense and structured in an unusual way. The utilization of a program that filters the noise, such as Noise Ninja, does not produce the desired results, probably because the disturbance of the image does not occur at the frequencies for which the plug was designed.
In order to eliminate these artifacts a possibility is to apply a Gaussian filter, taking the noise out of focus and smoothing the image. The loss of detail in this case is almost always quite insignificant, considering that the zone plate photographs is already naturally very out of focus.
Another possibility is to add some grain in order to mask the digital noise. Personally this is a technique I prefer because in a completely out of focus image the grain creates a kind of constant to the eye in a word completely out-of focus, a steady structure allows a sort of system for visual reference to form.
When you add the digital noise in order to stimulate the grain of the film it’s essential to observe the result on a proof print, as the screen rendering causes an entire series of artifacts principally due to problems of aliasing. The images attached to this article are therefore only an indication. In each case, after many attempts with the original file, I have obtained optimal results on A3 size paper, using an Epson 2100 ink jet printer.
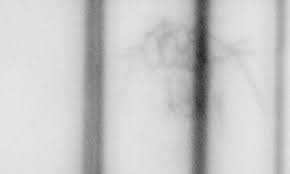
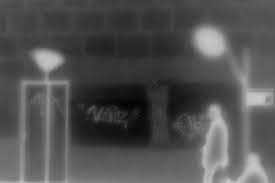
In the first place I have developed the raw file converting the photograph in black and white and playing considerably with contrast and curve. I completely burnt out highlights and set the shadows to pure lack, because what was interesting to me was the graphic effect and to amplify the impression of blinding light which is one of the characteristics of the zone plate photographs that attracts me more. The obtained obtained tonal range is typical of underexposed and overdeveloped films, that has a strong and intense grain.
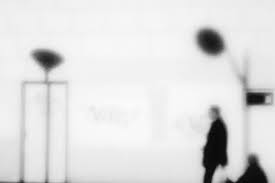
Notice that in the mask, obtained as a simple negative of the original image, there are diagonal bands crossing the whole picture.
The resultin image, once opened in Photoshop, present a kind of noise that is very hard to remove and that looks badly. After removing all the dots correspond to grains of dust on the captor (in the case of zone plate and pinhole images, given the infinite depth of field, the dust on captor are all quite visible) I made a slight change of sharpen to make a drier noise. I then duplicate the layer and added a very strong monochrome Gaussian noise, more than I really needed, to have a good starting point.
In this way the noise evenly covers the image making it flat and not very bright. You see immediately that this is a uniform layer of noise superimposed to the photo, which does not looks as a real photographic grain, that instead constitute the image of silver salts when we use very sensitive film.
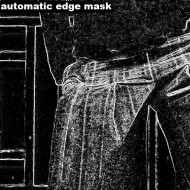
A simple and fast technique to have a nice effect is to simply add a mask to the layer with the uniform noise, to avoid add noise to the highlights.
In this way photography will mantein its contrast and brightness, and the uneven distribution of Gaussian noise looks as analog grain. To achieve this effect simply create a mask that is the negative of picture, and in the channels box, simply press ctrl and click on a channel, invert the selection, return to the pallet layer, make the layer which with the Gaussian noise active and add a layer mask.

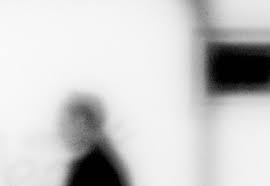
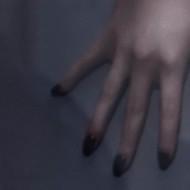
Typically, this mask is too contrasted and needs some additional work, for example with the “levels” is easy to obtain the desired results. In general it is appropriate to make the black point a dark gray (using the “output” slide of the levels) in order to apply a minimum of noise even in high lights of the image. Following may be useful to intensify or reduce noise locally, lightening or darkening the layer mask. In this case, for example, I avoided to apply a too intense noise darkening the mask on the man body. To finish fine tune the final effect with the opacity of the layer.
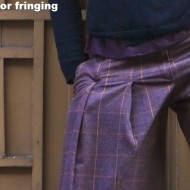
With some experience you can understand the effect watching the picture on the screen, but, at least initially, is certainly appropriate to make print proofs. The final results is nice and realistic. There is the softness, the halos of light typical of zoneplate photographs, but the photographic structure consists of a nice, dry and well designed grain, very close to the the grain of old high sensitivity films.


Sei troppo avanti…Un salutone
Ste
Grazie mille Ste, i complimenti fanno sempre piacere.
Ciao ciao
f
Il “rumore” che si nota sulle foto Zone Plate è l’effetto della diffrazione sugli anelli
concentrici, che dovrebbe essere differente dal rumore digitale.
Puo’ essere che intendiamo la stessa cosa…, è cosi’??
Mi sono occupato di foro stenopeico e zone plate, ma non in digitale.
Complimenti per le foto, e la funzionalità del sito.
Artesiano
Ciao Artesiano
e grazie dei commenti.
Diaciamo che in questo articolo utilizzo il concetto di rumore in senso lato e un po’ vago. Ci infilo dentro il rumore digitale, la diffrazione dello zone plate, le bande diagonali probabilmente dovute ad una “reazione” dell’algoritmo di demosaicing allo zone plate, etc.
Insomma, in queste righe “rumore” include tutto ciò che è, a mio gusto, un disturbo dell’immagine.
Ai fini pratici comunque poco importa, visto che nell’articolo è spiegato come coprire tutto con del grano simulato.
Ciao e grazie ancora
f
You can also subscribe to this post comments RSS feed.