
Concerning analogical photography, once fixed the negative enlarger factor, the detail of a print is principally determined by a good shooting technique (absence of micro blur, correct focusing, correct depth of field and so on) and the resolving power of the shooting objective and the one on the enlarger. The image grain is determined by the film choice, exposition and development. Moreover the development allows controlling the acutance of the image. Furthermore, during the print phase, it is possible to modify both the detail and the picture grain, for example using contrast masks or out-of-focusing some zones with pantyhose interposed between the objective and the enlarger plan, but the interventions are long, laborious, hard to perform and have a somehow limited impact on the acutance and the image grain.
In the case of digital photography, shooting technique, objectives quality and exposition choice strongly influence the details and grain (or better: noise, as analogical grain and digital noise, even if similar, have different origin and characteristics). Anyway, the photographer now has two powerful instruments: sharpen filters and noise reduction filters.

Unfortunately those instruments are often hidden to photographer or they are used mechanically and roughly. The consequence is that many old analogical photographers complain the noise and the absence of sharpness in digital images, thinking that it’s a defect inside the shooting system. Actually, this is largely due to the incorrect use of sharpen and anti-noise filters. The correct application of those instruments could bring to result similar to the ones the analogical photographers are used to or even better ones.
The article (in Italian) The sharpening, of whom I strongly suggest the reading, written by Andrea Olivotto, makes wonderful explanation of the digital techniques to control the acutance. It is a complete article, both for the introductive definition and for the advanced techniques, with tons of links to different articles, plug-ins and on-line resources. Russell Brown’s amazing website has a couple of video tutorials about sharpening, as well as on masks, that are intensely used in this article.
Talking about noise reduction, Noise Reduction Tool Comparison makes a complete confrontation of different software. Unfortunately, as software change (and ameliorate) frequently and quickly, the article is a little bit out of date, it would be better to take it as a list of possible software, software to be tested to find the one that better satisfy our needs. I once wrote an article on Camera Obscura about noise reduction as well: Add noise to eliminate noise.
Sharpen and noise reduction workflow
Talking about my own workflow, first of all I put the sharpen and noise filter of Camera Raw to zero. Then I almost exclusively use the Smart Sharpen of Photoshop (go and see the finest Russel Brown’s tutorial at Smart Sharpen revealed) to manage the detail and Noise Ninja to reduce the noise. I use those filters because I know them well and the result completely fulfill me, but I’m not stating that this is the best combination. Anyway, the ideas exposed in the article – sharpening, noise reduction and the local application of the filters – can be well exploited no matter what kind of algorithm you will use to augment the acutance or reduce the noise of the image.
As any digital technique, there’s no manna from heaven that solves all of the problems automatically, otherwise it would be part of the firmware inside the digital camera. The most excellent results are obtained adapting the use of the instruments to the type of image on which you’re working and the type of result you’d like to achieve.
Depending on the case, I only use Smart Sharpen or Noise Ninja, possibly selecting the zones on the image where I can apply those filters. For example, I strongly apply Noise Ninja on skies, obtaining clear blues, even when the clouds contrast is augmented for retouch interventions. I apply only Smart Sharpen for detailed zones, such as gardens and hair.

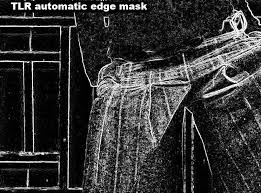
There are cases in which the manual procedure can be automated or completed by the use of surface and edge masks digitally generated. For this goal, I often use the TLR professional sharpening toolkit plug-in, which allows to obtain splendid results on images with both uniform and detailed zones. The results are particularly respectable, most of all when the masks are defined by hand, so that they completely adapt to the image. All these operations are effectuated on two copy layers of the background, one for sharpness and one for noise, where the masks are applied. This way it is possible to modify the intensity of the effect or the zones where the effect itself is applied.
In addition there are cases where this technique needs to be refined. Some images are particularly hard to work with and the choice of this or that software, the choice of the mask and so on are part of difficult compromises. Images with a strong noise, underexposed or shot on high iso sensibility, which still present highly detailed zones mixed with noise, such as sea surface or dresses, are particularly hard to be processed. In this tutorial I will show a solution that will use all of the quoted instruments and that will give back astonishing results in those complex cases.
Recovering wrong pictures

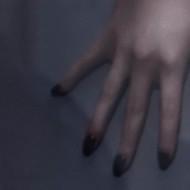
The image I used in this tutorial is part of a job I made some time ago. I set the camera “manual” to take some pictures of a location to paste in a stitch. Then the model straight a strange pose and I suddenly took a picture, without taking care to the exposure. As I was strongly underexposing the camera, I changed the parameters of the exposure, but the image I finally chose was the stolen image itself.
The only possibility in this case is a good editing effort, to turn the picture into a good work. I adjusted the general exposition with Camera Raw of even an entire stop, opening shadows with Fill Light command. I then managed the local contrast with Photoshop, augmenting it in different zones to entirely regulate the gamut of the picture. These operations obviously brought to a considerable and unacceptable augment of the noise. In this case is exceptionally hard to select the uniform zones to the detailed ones by hand, because an intricate mosaic constitutes the background. There are many lines that must be exalted and at the same time flat areas on which the noise is too evident. It is evidently a hyperbole; the best would be taking the picture again correcting the errors. From the didactic point of view though, this is an amazing opportunity to illustrate the technique we’re working on in this article.
The values of the filters and the used settings

To compare the images, the filters have been applied with the same values. To obtain better result, it would be recommendable to accurately choose the parameters of each filter, but this is only a demonstration.
Noise Ninja, with the profile adequate to the ISO sensibility and the right camera model set, has been used with value 15 for strength and smoothness, both for luminance and color. Those relatively high values have been used to demonstrate the consequences of an aggressive use of the reduction noise filter. The contrast has been kept at 10 and sharpen filter at 0, to use Smart Sharpen only for acutance. Smart Sharpen has been used in its base version for a simpler learning, with 130 of amount and 0.8 of radius, kind of standard values for such dimensioned images. The TLR plug-in has been used to generate surface and edge masks, with High Resolution values for the camera and medium for Sharpen Width.

Sharpen and noise reduction of Camera Raw have been set to zero and all of the operations have been done at 16 bit. Smart Sharpen and Noise Ninja have been applied under all the adjustment layers, which means that all the filter operations have been applied after the “developing” with Camera Raw and before the tonal corrections in Photoshop. At the end of your work, all the image versions have been flatten, converted to 8bit-sRGB and saved in JPEG format with 10 as compression value. The attached images are all cropped at 100% of the original image; no modification has been made to the native dimension of the picture. To comfortably compare all the images, I suggest downloading them and observing each on 100% zoom, as the aliasing effects could modify the acutance perception and the noise reduction. A compressed file with all the images of the article is available for the download (2.3 Mb).
Simple use of Noise Ninja and Smart Sharpen

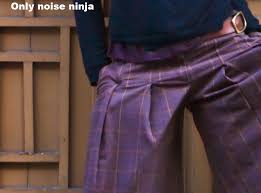
The first image is the file without any filter. The chromatic noise is particularly annoying on pants, while in uniform background zones the luminance noise is irritating. The image is thick and less detailed because of the loss of sharpness due to the demosaicing process. To obtain an acceptable result, the noise must disappear from clothes, keeping at the same time the natural appearance that they are constituted of. Moreover, the background luminance should be reduced, without compromising its mosaic lines.
Just to be complete, this is the result you get using sharpen and noise reduction integrated in Camera Raw. The chromatic noise disappeared from pants, but their details too. More refined instruments will lead you to richer details. At the same time on the background there are artifacts that I find unpleasant, Noise Ninja is definitely more efficient.
Applying only Noise Ninja on the entire image, the result is amazing on uniform zones, but the algorithm keeps the sharpness of the background mosaic lines as well. Unfortunately though, the details of clothes are irreparably flatten, giving the picture a plastic and false aspect, particularly objectionable. The following application of Smart Sharpen allows to recover some acutance, but visibly augment the residual noise that hasn’t been filtered by Noise Ninja.
In like manner, applying only Smart Sharpen on the entire image doesn’t lead to any good result. The picture is sharpened but noise is amplified unacceptably. Using Noise Ninja after Smart Sharpen as well is disastrous.
Surface and edge mask usage
The surface mask is equal but inverted.
Using Noise Ninja and Smart Sharpen together is one possible solution, trying to separate their effects so that the first one will be applied only on uniform areas and the second one only on the edges of the image. The difference compared to previous results is that no more filters are applied on the entire image. Where sharpen is applied noise reduction is not and vice versa.
TLR plug-in automatically generates some surface and edge masks. Two background-copy layers are created, one with surface mask and Noise Ninja and the other one on top with edge mask and Smart Sharpen. Please remember to put blend option to luminosity of the sharpen layer, so that the chromatic noise won’t be emphasized.
This kind of configuration used on our image allows satisfying results for the background, where the noise is almost completely gone from the flatten areas, while the mosaic lines are correctly accented from the sharpen. The shown example is only the result obtained automatically, adjusting Noise Ninja and Smart Sharpen values; varying layers opacity and ameliorating masks by hand you will achieve excellent results.
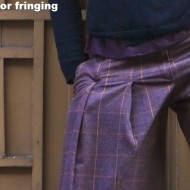
Excellent result anywhere, except in highly detailed zones, such as clothes. Augmenting the sharpen improves the acutance, but increases the noise and loose the fabric weft. Moreover TLR can’t generate a correct surface and edge mask. Noise and detail in this case are intimately related to each other and it is hard to separate them in a way that they can be filtered independently. Any solution will be a less satisfying compromise.
Augmenting the luminance detail filtering the chromatic noise

Thinking about what is the noise, where is evident, which cases are annoying and what you would save of the image would bring to a satisfying solution. The first consideration you should do is that generally the chromatic noise is unpleasant, while the luminance noise, most of all if uniform, is in many cases acceptable. The second consideration is that noise is particularly visible in uniform areas of the image, while where the zone is detailed, even if noise is particularly intense, it always goes unnoticed. It could seem a banal statement, but it is good to underline that the luminance noise in highly detailed zones is rarely irritating.
To put in practice those ideas, let’s take the precedent configuration and simply eliminate the edge mask of the sharpen layer (also the noise layer mask could be eliminated, without the edge mask the surface one is completely unuseful), without forgetting that the blend option of the layer must be luminosity. Once again, compared to the firsts examples, the sharpen and noise reduction are applied separately. Both filters are applied to the totality of the image, but individually are applied to a blank copy of the background, therefore they doesn’t negatively interact as seen before.
Proceeding this way you obtain perfect details into clothes. The grain when visible is sharpen and pleasant, the chromatic noise disappeared but in the meantime the fabric weft is kept perfectly, the details of the fabric are set to the right value from the sharpening. Well, obviously the noise background, without the edge mask, augmented even in the flatten areas. Anyway, the grain obtained is defined and monochromatic, so much that the image could be acceptable without any other intervention.
If in some zones of the image a residual chromatic noise is still present, it is possible to eliminate it with a technique inspired to the one that eliminates the color fringing. The details are illustrated into the article Anti color fringing to eliminate the residual chromatic noise.
It is possible to automatize all of these passages downloading the action set Noise&Sharpen.
Local application of detail augment and noise reduction

To obtain the best result ever, at this point it is necessary an intervention by hand on masks. For the definitive version of the image, I kept on pants the sharpen layer over the noise layer without any mask. On the shirt I only applied the noise reduction and no sharpen. I then added a slight Gaussian noise, as explained in the article Add noise to eliminate noise.
As far as background is concerned, I applied surface and edge masks automatically generated by TLR with a little of Dust&Scratches filter to smooth down a bit. This is because in noisy images the grain is interpreted from the plug-in as detail. At the same time, I turned the black zones of the edge mask into grey, so that the background has some details more and an insignificant grain, similar to clothes. Those forethoughts are necessary to avoid the plastic effect of the smooth surfaces obtained with aggressive passages of Noise Ninja. At the end of your work, some modification to the layer transparency to harmonize the image. Obviously the image is a pure example. Following your personal taste, clothes can be too sharpened and unnatural, you could dislike the grain on the background, etc. Anyway those are my personal choices, the important point is that you have two layers at your disposal over the background that make you obtain all of the desired effects, only varying opacity and masks.
In the complex, as the majority of the masks are generated automatically and that manual selections can be quickly done with laze and a shade of tenth pixel, the procedure for the local application of sharpen and the noise filter took at last 5 minutes. The results are astonishing if compared to the initial image. Pants are extraordinary detailed, background is smooth as if shot with 100 ISO and correctly exposed, the grain only give substance to the surfaces and is not visible if printed. The results are so convincing that I saved a shot that was completely wrong and I gave the work as the picture simply wasn’t exposed by the book.
Video tutorial
I realized a short video (in Italian) with a practical demonstration of the editing technique described in the article. This way, even the Photoshop beginner can see how to create surface and edge masks, how to generate sharpen and noise reduction layer, how to work with filters and how to modify the masks to modulate the plug-in effects.
[youtube S4Xth4QwRi4 nolink]


You can also subscribe to this post comments RSS feed.