The majority of alternative and antique techniques use material that is sensitive to UV radiation but not to visible light. Moreover almost all the supports are slower than the usual silver nitrate paper. Therefore, it is not possible to use a simple enlarger as in dark room. It is necessary to use a big UV light source and print by contact using a printing frame to obtain the perfect contact between negative and print support.
In reality, at least theoretically, it is possible to use an enlarger, but in practice it is not sufficient to substitute the lamp with a UV one. Other problems make a machine for contact prints more practical and economical.
First of all, as the light quantity decreases with the distance square from the source and as the scarce sensibility of the materials, the light source must be powerful and efficiently frozen not to burn the negative. The exposition time with an eventual UV enlarger are long, on line 15 minutes are said to be necessary for a 18×20 bichromate gum, and this is impracticable with a cyanotype yet, technique that generally takes from 3 to 5 times the time required from a gum. Bigger formats would require hours of exposition, while gums contact print in a couple of minutes, independently from the format. Enlarging negatives can be a long, complex and tedious operation, but when a series of 20 prints from the same negative has to be printed, exposition time must be reasonable or at least inferior to the one required enlarging a negative. Without considering that now you can obtain high quality digital negatives quickly and without any effort.
The second big problem is that the majority of glasses filters generally used as objectives filters the UV. El Nikkor objectives let the 50% of UV radiation pass, therefore they could be a good starting point. But here’s another problem: the objectives are projected to minimize the optical aberration in the visible area, not in the ultraviolet one. Moreover there’s the same problem of focusing that we would have shooting on an IR film, and it doesn’t exist any simple way to correctly focus the negative on a print surface.
Rumors say that some years ago Durst announced an enlarger that printed on silver salt paper, on AZO paper and furthermore on Platinum and Palladium. I don’t know if the rumors are founded. The only thing I’m sure of is that the AZO paper enlarger cost 12.000 dollars plus another 5.500 for the light source, and that was quite an expensive solution for a UV enlarger.
To sum up, as obtaining enlarged negatives is not so difficult, contact printing lets you save some time, it is an economic and simple choice and eliminates all the aberration and focusing problems proper of the objectives.
Talking about the materials choice, types of light and so on, on Unblinkingeye there’s a wonderful article by Sandy King titled Ultraviolet light sources for printing with the alternative processes, so I will not repeat what’s been already explained and deepened there.
Choosing the light can be an important variable, as the article quoted before says. The light source used in fact, more than execution rapidity, can influence contrast, color and more in general all the print characteristics.
Possibilities are boundless: from a simple tanning light (not suggested though, because it excessively heats up and emits a lot of B-type-UV rays, bad for skin and completely filtered by glass) to a bromograph, a machine used in the past by typographic houses to engrave off-set slabs (that has the advantage to create emptiness for the contact between negative and print, making useless the printing frame; the littlest has a functional surface of 50×70 cm, that allows easy big format prints), to the sophisticated AmerGraph ULF-28, dream of every contact printer.
Generally though it is not necessary to use refined and complex machines. To obtain good prints it would be enough to use the sun, if the sun wouldn’t be used to be an inconstant source of light, hardly quantifiable, and most of all not disposable during the night, moment when the majority of the prints are done. During this article I will shortly describe the light source I use right now, an economical and simple solution to build that will give back excellent prints in a reasonable time. I take the occasion to give some advices to ameliorate your own UV source for contact prints.
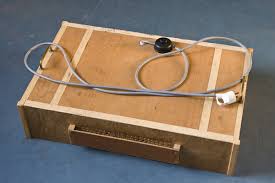
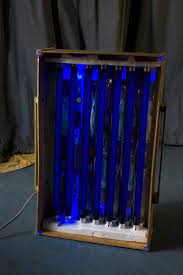
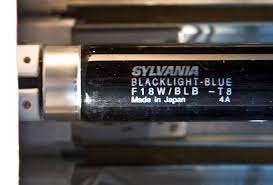
The light source comes from tubes similar to those found in some discotheques, the ones that produce violet light that reflects on white clothes showing dust on them. The fact that it is used as constant light in public places should ensure anyone that there is no ultraviolet B type rays in them and that they are absolutely not harmful. Even if, for precaution, I do not look at the turned on tubes, I never had pain to my eyes or my head, as some printers says. I use Sylvania Blacklight-blue F18W/BLB-T8 that are 35€ each, but I think every kind of black light neon can be ok.
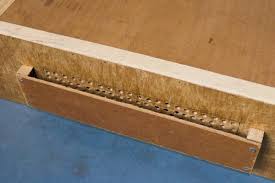
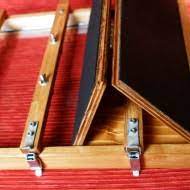
As I print at the most A3+ format, 32x48cm, I calculated the number of tubes to cover this surface, putting them together, that is 7 tubes of 60 cm that cover an area of 38×60 cm. Actually at least another tube would have been useful, as I see a slight loss of light on the vertical borders of the image. Therefore I suggest everyone who wants to print A3+ negative format to use at least 8 tubes of 60 cm, or cover not less than an area of 45×50 cm. The extern surface of the box must be studied in a way that it adapts to the used printing frame.
Tubes have been mounted as near as I could, that is a distance between the axis of approximately 5,5 cm, the neon supports don’t allow going further. If you find finer supports, it would be possible to augment the number of neon if the surface is equal. Even if it augments the total cost of the unit, it also augments the quantity of light, therefore it decreases the time of exposition.
The distance of the neon from the printing-frame is kind of thin, 6,5 cm and for the little print I reduced the distance at 4 cm. The uniformity of the illumination never presented any sort of trouble of bands in correspondence of the tubes, therefore a distance of 5,5 or 6,5 cm between the tubes itself and the image plan allows a completely uniform enlightenment.
This sort of configuration gives back expositions of 2-3 minutes for a bichromate gum, 3-4 minutes for a brown print, 4-5 minutes for platinum/palladium and 10-15 minutes for a classical cyanotype.
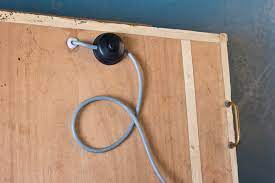
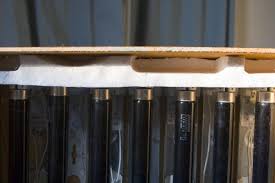
The rest is all about a simple wood box with some tubes mounted inside. The external dimensions are 42x68x16cm (50x68x22cm if we count the protrusions). There are two handles on the upper part that help moving the unit. An interrupter, foot-actionable too, contemporaneously turns on and off all the neon. I should substitute the interrupter with a timer shortly, because often I forget to measure the exposition time. A timer should only be adjusted and then you can forget about your print, waiting for the alarm to ring while doing your own things.
On the unit side there are some holes that allow the air circulation, avoiding an excessive temperature of the neon. This is an important point, as the UV-light quantity drastically decrease as the temperature increase. A little fan would be better and I will add it as soon as I change the interrupter with the timer. In any case, the box gets too hot during the long exposition of cyanotype prints. During bichromate gums the fan isn’t quite necessary. Fixing a fan would also limit the UV-rays out, for example putting right a siphon muff that would let the air out. The holes are just protected and I have to avoid passing near the box with another sensitized paper if I’m exposing a print.
Another trouble I had in the past is, at last, that the neon supports are projected to be fixed into walls and never be touched anymore. Moving around the box, the lateral supports became so flimsy to unwrap and let a tube falling down (that punctually broke on the printing frame). I completely solved this problem fitting in some polystyrene bars that will press on the supports of the neon.
Even if my UV-light box is perfectly efficient, last year I had the occasion to work with a printer that fixed the neon inside a static furniture. On the front, there’s a door that perfectly close, therefore it needs only to put the printing frame on its own sector under the lights. I must say that, if I should build another UV unit I would probably follow his example, as furniture would completely solve the falling down of neon, a door would contain the leak of UV radiations, it would be easy to mount a fan and a timer and there would be no moving, no taking and no tiding up the unit, and this is quite a lot. You should only open the door and inserting the printing frame, everything is within reach. The only disadvantage is that this way you cannot print on a support bigger than the furniture itself. For example, if you’d print A3+ negatives centered on a 50×70 cm paper, the printing frame would measure 60×80 cm, with an illumination box of 45×60. Those dimensions are reduced if compared with eventual furniture that allows the printing on 50×70 cm. Once said that, once accurately decided the dimensions of the print you will realize, furniture is absolutely more comfortable then a mobile box.


vocês são formidaveis…muito bom o trabalho de vocês…continuem…
grande abraço
rodolfo
São Paulo
Brazil
hola fabiano i have think about the uv light if you use a difusser enlarger
wihtout condenser lenses and if you use a pin hole “lens” like enlerging lens only a iris or only a positive menisc lens , do you think its posible the uv light arrived to the salat paper print for example,
note : the low quality resolution on a pin hole sistem could give to the print a fine artistic style, i no forget the long exposure time its nesesary
thank its only one idea
Hola Raul,
the problem with an enlarger, especially with a pinhole, is that the light source must be placed quite far from the print, and light intensity decreases as the square of the distance. All historical process have a small light sensitivity compared with modern supports, so you always need plenty of light to keep the exposure time reasonable.
You can also subscribe to this post comments RSS feed.