Compared to digital negatives, analogical negatives adapt more easily to the used techniques, allowing a larger margin of interpretation.
Digital negatives are precisely calibrated on an ensemble of constant variables. They practically function correctly for a certain type of paper, sensitizer, drying, etc… But they give bad results when changing those parameters, even for little changes. The consequence is that digital negatives are useful when a standard for a certain technical paper is established, but while searching and experimenting is easier to use an analogical negative, which better accomodate the variations of the printing technique.
It’s the reason why, even if in general I print using digital negatives or little contacts taken from 120mm negatives, I sometime prepare enlarged negatives. The procedure to obtain it is long and complex, lots of tests are required to learn how to obtain a negative perfectly adapt to a certain print technique.
During the first experiments I produced a series of enlarged unusable negatives, obtained contact printing a RC paper positive. Negatives always had completely transparent shadows and completely opaque lights, caused by the excessive contrast of positives on paper. As ideal negatives for antique techniques are usually thick and with not many transparent parts, those enlarged negatives were clearly unprintable: closed shadows and completely burned high lights, even using long exposition times while printing.
I would have found a way to reduce them and obtain printings from all those otherwise unused negatives.
One day, leafing through the book “The darkroom cookbook” I thought I could have tried some formulas to reduce negatives, to experiment and see if I could use those negatives.
I obviously needed a super-proportional reducer, but a particular formula suddenly stimulated my curiosity: the Eder’s harmonizing reducer. The book said:
This reducer works in a special manner, intensifying shadows and reducing high densities. It is used to correct exceptionally contrasted negatives.
That is, at least on paper, exactly the reducer I was searching for. This formula allows not washing away those little details of the shadows, or better intensifying them, and reducing high lights otherwise impossible to print.
Well, a dream.
Formula and instructions are the following:
Water 750ml
Hydrochloric acid (concentrate) 30ml
Dichromate potassium 10g
Alum 50 g
Water 1l
Completely whiten the negative in this solution and wash until the yellow color is entirely eliminated. Develop in a slow revelator, highly diluted (D-23 1:5 for example), therefore fix and wash.
And here’s a ton of questions that suddenly crowds my mind even before getting ready:
- What does “concentrate” mean?
- Does “Alum” stand for “Potassium alum”?
- Can the operations be carried out in a normal light or in actinic light?
- How can I foretell the right re-development time for each negative?
I couldn’t find any information on line about this reducer, but on www.apug.org forum I was said that I can actually use potassium alum and that muriatic acid has a concentration of 6N, while the hydrochloric arrives to 12N.
Materials and preparation to reduce negatives
Wikipedia says that hydrochloric acid concentrated more than 37% is a smoking gas, so I don’t think we have to use a gas that surpasses this concentration. Unfortunately this answer arrived after some tests with a hydrochloric acid solution that was less concentrated (0.1N), solution that functioned in any case.
If my chemistry memories are corrects, a solution of 0.1N of hydrochloric acid equals a concentration of 0.1M that is 36,5g of acid per liter of solution. As HCl density is 1,64g/ml, it corresponds to a solution of 0,2% that is 60 times more diluted than the concentrated hydrochloric acid. The proportion tells that 500ml of solution 0.1N contain almost 1ml of pure acid, while 30ml of concentrated acid contain almost 10ml. If all those calculations are corrects, I used a tenth of the hydrochloric acid indicated in the original formula. In any case, the solution seems working.
I put in a blender 300ml of tap water where I added (remember to add acid in water and not vice versa) 500ml of hydrochloric acid 0.1N. I made approximate doses, but as the recipe doesn’t give any advice about the requested concentration, I couldn’t make any equivalence. In any case, as hydrochloric acid is dangerous, I rather handle less concentrated solutions.
I added dichromate potassium and alum potassium to this solution, following the book indications. I made all the operations in daylight and it doesn’t seem to cause any problem
Negatives are Adox films, developed in ID11 B dilution, 1 to 5 minute, with an excessive contrast.
I re-developed using Perceptol diluted 1+4. This development should be like D-23 that is no more on the market (even if, I might say, the formula is reported on The darkroom cookbook).
Observation on the behavior of Eder reducer
Eder harmonizer reducer bleach negatives. I noticed though that the power of the solution rapidly decreases. After a dozen of bleached negatives 24x30cm, it takes more than 10 minute, while the first one took only one minute. This could be due to the fact that I’m using a solution that is less concentrated in hydrochloric acid.
I noticed any yellow stain, as the book said. Bleached negatives have a faint grey-green color and it doesn’t change even after an hour of wash.
The re-development seemed to me complete after 2-5 minutes, depending on negatives. Working with daylight allows an easy estimation of the negative, but the method is very approximate. In any case when working on accurate sensitometry normally you never have to reduce negatives.
Re-developed negatives color is brown and reminds in a certain way films developed with pyrogallol. It made me think that those kinds of negatives would have filtered a lot of UV giving particularly long exposition time. In reality it didn’t happen, so it seems like the coloration occurs in the visible part or that it doesn’t interest the wavelength sensitive to cyanotype or Van Dyke solutions.
A silver-gray layer settles in the re-development basin, more quickly than the one usually settled in the development basins. In any case, it is easy to remove with a little scratch.
Dupont 4-R problems
During the re-development I noticed some stains and irregularities in the negatives. They look like the streaks that I obtained with the old mirror toning by Tetenal when the bath wasn’t shacked correctly.
As I didn’t know if they came from the development or the reducer, I tried to pre-humidify the negatives before the reduction and the situation lightly ameliorated. Shaking continuously and energetically during the re-development seems eliminating the problem.
I noticed other types of stains, completely different from the firsts. Some marked right lines, maybe some problems of Adox films.
In each case, defects are visible in uniform zones, making the negatives poor of details unusable.
Results of negative reduction
The reducer seems working out. It reduces strong densities and intensifies the weak. I must admit I couldn’t believe it until I saw it with my own two eyes.
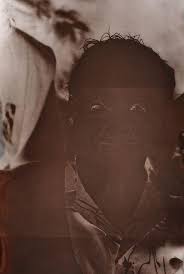
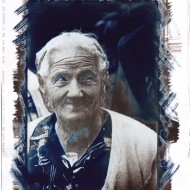
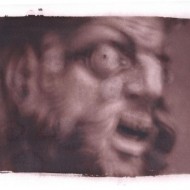
The majority of reduced films turned into decent cyanotype prints. There’s an augmentation of the shoulder of the negative curve and in many occasions lights, even if they become printable in a reasonable time, are flat and dirty. In some other cases anyway, negatives gives more than acceptable prints.
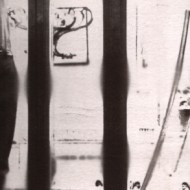
I printed with a friend of mine a series of cyanotypes of the last fragments of the Berlin wall. Unprintable negatives, with high washed lights even after 40’ of UV, after reducing, gave best results in 12’. The final print of one of my portrait instead is barely acceptable, with high, dirty and flat lights.
Conclusions on Dupont 4-R, Eder’s harmonizing reducer
The few experiments I made with Dupont 4-R, Eder’s harmonizing reducer surely surpassed all my expectations. This reducer saves unusable negatives even if it can’t work magic, and sometime results are mediocre. It depends on the image and its negative; talking about the Wall’s series, the result has been more than satisfying and the reducer allowed me to save otherwise unprintable negatives.
Its only problem is related to the stains obtained during the re-development. Even if an important shook seems to eliminate all the little streaks from the film, there are some clear and unpleasant lines that remain and turn the print of images with huge uniform zones impossible.
I only need to verify if those problems are due to Adox films defects, to the re-development product used (Perceptol) or to the particular formulation of the reducer. In fact the use of a higher quantity of hydrochloric acid gives a reducer that nears the formula described in “The darkroom cookbook”, and could maybe remove the problem.
In any case the experience demonstrates the saying that all the printer of antique techniques knows: “do not throw anything away, one day you’ll find a way to use your waste”! In this case, some unprintable negative has been reduced in a gratifying manner, giving prints far from any expectations.


You can also subscribe to this post comments RSS feed.